Here’s something that I have found useful at work. The company I work for full time uses SSL for its websites extensively. For our production systems, this means purchasing SSL certificates from a widely recognized Certificate Authority like Verisign or Thawte. But what about our development, QA and staging systems? It can get expensive when you’ve got 10 or 15 different pre-production environments that need SSL. So, here is a potential solution that doesn’t cost much money. Build your own CA on Linux and publish the certificate as a trusted CA throughout the company using Microsoft’s Active Directory.
It’s really a straight forward process and works very well. To those that ask about building a Certificate Authority in Active Directory… Yes, you can do that too. However, I have a number of Linux boxes also and have built a CA several times on this platform. I could do it in Windows, but this was quite fast to setup and minimized any risks of tacking this onto our AD domain.
So, first off get a Linux or BSD based server built and hardened. If you like you can check out the FreeBSD 7.0 build guide on this site. I’ll be using Ubuntu Linux 8.04 for this example. I’d recommend running the CA on a dedicated server with no listening services except for openssh. I’d also strongly recommend using SSH keys to connect to the server as well. This is where your SSL private key is going to reside and you want to protect that.
Setup the Certificate Authority on Linux
With your new server up and ready, lets ssh into it and get started. First, you will need to install openssl if you have not already.
# Install openssl
jwood@gomer:~$ sudo apt-get install openssl
The install will create an ssl directory in /etc. Lets move there and create the SSL private key
jwood@gomer:~$ cd /etc/ssl/
jwood@gomer:/etc/ssl$ sudo openssl genrsa -des3 -out ca.key 4096
Generating RSA private key, 4096 bit long modulus
...............................................++
....................................................................................................................++
e is 65537 (0x10001)
Enter pass phrase for ca.key:
Verifying - Enter pass phrase for ca.key:
jwood@gomer:~$
To explain what we just did, here’s brief overview of each option in that command. The first two commands are “sudo openssl”. Sudo runs openssl with root privileges. The rest of the command are options for openssl. They were “genrsa -des3 -out ca.key 4096”. We are telling openssl to generate an rsa key (genrsa) that is 4096 bits using triple DES (-des3) and put the key in ca.key (-out ca.key). Then we were prompted for a password to use in the key. Make this a good long password and keep it very secure.
Ok, our key is ready, now lets create the public CA certificate. You will be prompted several times to provide some information to add to the certificate, so be prepared to answer them for your environment.
jwood@gomer:/etc/ssl$ sudo openssl req -new -x509 -days 365 -key ca.key -out ca.crt
Enter pass phrase for ca.key:
You are about to be asked to enter information that will be incorporated
into your certificate request.
What you are about to enter is what is called a Distinguished Name or a DN.
There are quite a few fields but you can leave some blank
For some fields there will be a default value,
If you enter '.', the field will be left blank.
-----
Country Name (2 letter code) [AU]:US
State or Province Name (full name) [Some-State]:Utah
Locality Name (eg, city) []:Layton
Organization Name (eg, company) [Internet Widgits Pty Ltd]:JW Network Consulting
Organizational Unit Name (eg, section) []:Technology
Common Name (eg, YOUR name) []:ca.tadaka.com
Email Address []:ca-admin@tadaka.com
jwood@gomer:/etc/ssl$
That time we used even more parameters for openssl. The parameters this time were “req -new -x509 -days 3650 -key ca.key -out ca.crt”. Basically, we are requesting a new x509 certificate that we want to be valid for 365 days (1 year). We want to use ca.key as the private key for the certificate and we are saving it in ca.crt. The expiration in one year may be too short for your environment. Personally, I’d pick something longer for pre-production systems. Prod systems, you may decide to do something else.
You now have a Certificate Authority ready for use in your environment. We need to copy the ca.crt to your Windows AD domain controller for the next few steps. I typically just use vi and copy the contents of the certificate from my ssh session to an RDP session on a Windows machine. Don’t be startled when you see the stuff inside this file. Its ciphertext and it isn’t supposed to be legible to us humans. Your computer will get it though. Here’s some of the certificate I just generated as an example.
jwood@gomer:/etc/ssl$ vi ca.crt

-----BEGIN CERTIFICATE-----
MIIGyjCCBLKgAwIBAgIJAPPGKCSBWEfgMA0GCSqGSIb3DQEBBQUAMIGeMQswCQYD
VQQGEwJVUzENMAsGA1UECBMEVXRhaDEPMA0GA1UEBxMGTGF5dG9uMR4wHAYDVQQK
ExVKVyBOZXR3b3JrIENvbnN1bHRpbmcxEzARBgNVBAsTClRlY2hub2xvZ3kxFjAU
BgNVBAMTDWNhLnRhZGFrYS5jb20xIjAgBgkqhkiG9w0BCQEWE2NhLWFkbWluQHRh
ZGFrYS5jb20wHhcNMDgxMDE2MDMyMDMwWhcNMTgxMDE0MDMyMDMwWjCBnjELMAkG
A1UEBhMCVVMxDTALBgNVBAgTBFV0YWgxDzANBgNVBAcTBkxheXRvbjEeMBwGA1UE
ChMVSlcgTmV0d29yayBDb25zdWx0aW5nMRMwEQYDVQQLEwpUZWNobm9sb2d5MRYw
....
....  More ciphertext here, but cut short for brevity
....
82CjWju2VftNHaUAI0FS25Vd6oMqBVdacXef0e3Nz+wpZ2BvB9nF8B39n3yKAQTe
9lsYyNHL2o7zII3l6sTNq7yb+ssznKlyU7NTgbfIYNnak3b7T6VMcO3LLsXBf/0E
jDXZtl60D/8zi5Esrty5NRIaFxtUL338Psp6cPo9/9p+p4fCH7AgocUwiv4A5Xsg
5REm8L9jhEiW4E/bvt8hF003noZNi7rl3fGQJZ08wocZPqgA6Ft6u+t4YfdGncda
Pz2ppZjqM3/srGy8BOPmgBFoDOjc7eJtpDCsvra2VLdbqTVR3TY+XiwpudK9O+Wp
V2UDw2PtvECqzFZxsSMhJidlQtbwJGbNtb2Gu2FEakNOoX8Zp0MDDK+hOrFLUzCU
EVmQnkKxEDEPsM8UCkpEwj0t7hujOMzgIk9cr8L7SGGygDPxz5WU/093qeB7dafM
JpKjPy3o+T/lgltrCzE=
-----END CERTIFICATE-----
Copy the contents of this file to a text file on your domain controller. Then rename the text file and change the extension to .cer so that it can be used as an SSL certificate. In my case, I named the file ca.tadaka.com.cer.
Import the CA Certificate to Windows Active Directory
Now we are going to use Group Policy to make this certificate authority a trusted CA through out the domain. Open up the Group Policy Management MMC in the Administation Tools menu. I don’t know what your GPO settings are like, so for this example lets just set this up in the Default Domain Policy. Use your judgement on how this should be setup in your environment.
Right click the Default Domain Policy and select Edit. This will open up the Group Policy Management Editor. Drill down in the option pane on the left. The path should be Computer Configuration -> Policies -> Windows Settings -> Security Settings -> Public Key Policies -> Trusted Root Certification Authorities.
Drill down to the trusted CAs
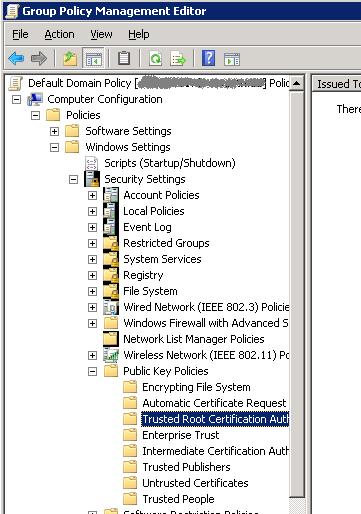
Right click Trusted Root Certification Authorities and select Import. The import wizard starts up and we select Next to get started. Browse to the location of the certificate file that we saved.
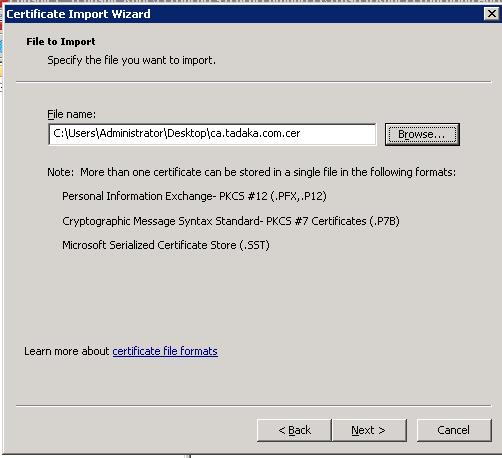
Importing the CA certificate
Click Next to accept this file. You will be prompted for a store to put the file in. Accept the default, which should be Trusted Root Certification Authorities. Click Next and Finish. You will get a window telling you that the import was successful. The certificate then shows up in the right pane as a trusted root CA.
That’s it. You now have an internal CA for use in your network. In another post I will go through the process of requesting SSL certificates and then signing it on your CA server. In the mean time, if you have any comments, questions or corrections let me know.

- Why Don’t We Hear About Western Cyber-Attacks? - September 17, 2023
- Interview with Carrie Roberts - March 27, 2020
- Interview with Michael Santarcangelo - March 4, 2020